|
/* Main.ino file generated by New Project wizard
* Created: 13 décembre 2022
* Processor: ATmega328P
* Compiler: Arduino AVR
*/
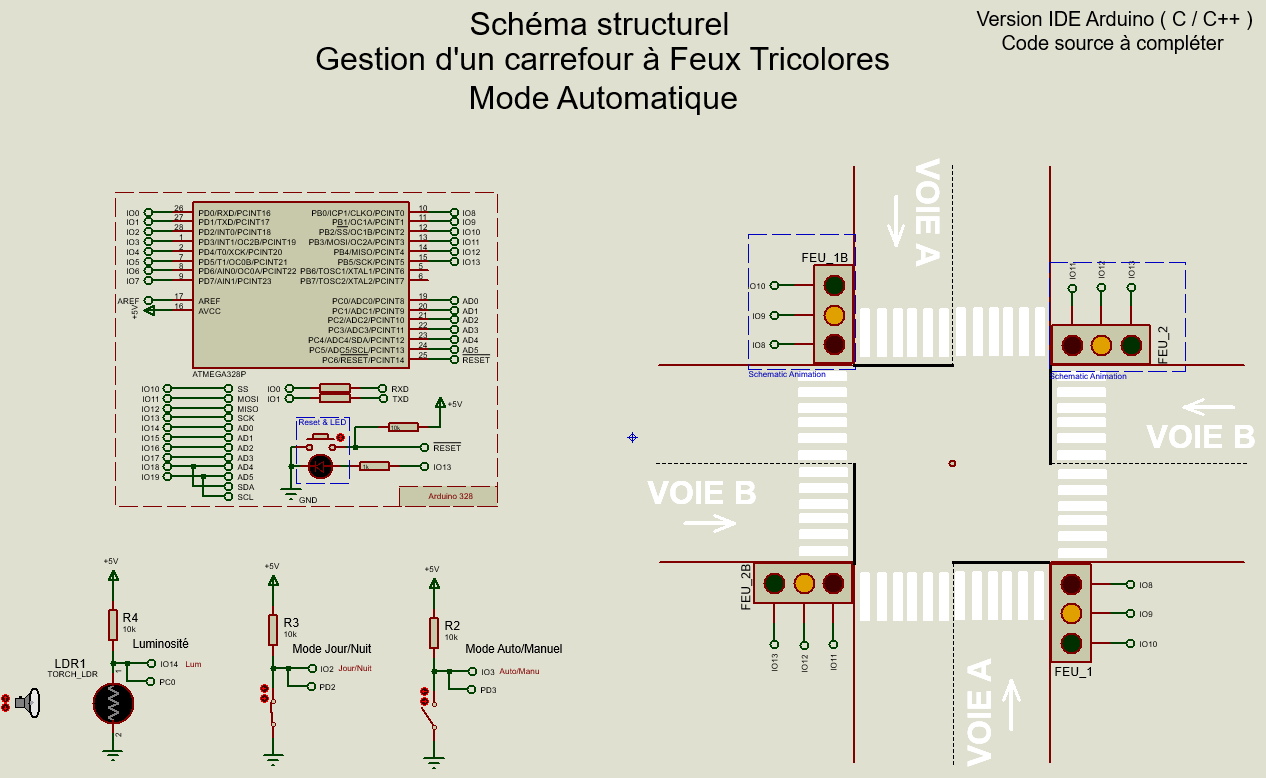
int ledR1Pin = 8; // LED Rouge feux1 connected to digital pin 8 pin 8 --> PB0
int ledR2Pin = 11; // LED Rouge feux2 connected to digital pin 11
int ledO1Pin = 9; // LED Orange feux1 connected to digital pin 9 pin 9 --> PB1
int ledO2Pin = 12; // LED Orange feux2 connected to digital pin 12
int ledV1Pin = 10; // LED Verte feux1 connected to digital pin 10 pin 10 --> PB2
int ledV2Pin = 13; // LED Verte feux2 connected to digital pin 13
int inPin_JN = 2; // pushbutton connected to digital pin --> Mode Jour/nuit (IO2 = PD2)
int inPin_AM = 3; // pushbutton connected to digital pin --> Mode Auto/Manuel (IO3 = PD3)
const int analogPin = A0; // the pin that the sensor (ldr) is attached to
int mode_JN = 0; // mode_JN:variable pour stocker la valeur lue du Mode Jour/Nuit
int mode_AM = 0; // mode_AM:variable pour stocker la valeur lue du Mode Auto/Manuel
int sensorRead_LDR; // variable pour stocker la valeur de la conversion Analogique/Numérique
void Mode_Nuit()
{
digitalWrite(ledR1Pin, LOW); // turn the LED off by making the voltage LOW
digitalWrite(ledR2Pin, LOW); // turn the LED off
digitalWrite(ledV1Pin, LOW); // turn the LED off
digitalWrite(ledV2Pin, LOW); // turn the LED off
digitalWrite(ledO1Pin, HIGH); // turn the LED on (HIGH is the voltage level)
digitalWrite(ledO2Pin, HIGH); // turn the LED on
delay(300); // wait for 300 ms
digitalWrite(ledO1Pin, LOW); // turn the LED off
digitalWrite(ledO2Pin, LOW); // turn the LED off
delay(200); // wait for 200 ms
}
void Mode_Jour()
{
digitalWrite(ledR1Pin, HIGH); // turn the LED on (HIGH is the voltage level)
digitalWrite(ledR2Pin, HIGH); // turn the LED on
digitalWrite(ledO1Pin, LOW); // turn the LED off by making the voltage LOW
digitalWrite(ledO2Pin, LOW); // turn the LED off
.....
}
void setup()
{ // put your setup code here, to run once:
pinMode(ledR1Pin, OUTPUT); // initialize digital pin as an output.
pinMode(ledR2Pin, OUTPUT); // initialize digital pin as an output.
pinMode(ledO1Pin, OUTPUT); // initialize digital pin as an output.
pinMode(ledO2Pin, OUTPUT); // initialize digital pin as an output.
pinMode(ledV1Pin, OUTPUT); // initialize digital pin as an output.
pinMode(ledV2Pin, OUTPUT); // initialize digital pin as an output.
pinMode(inPin_JN, INPUT); // sets the digital as an input --> Mode Jour/nuit
}
void loop()
{ // programme principal (loop) // à compléter
mode_JN=digitalRead(inPin_JN); // read the input pin PD2 (IO = PD2)
// lire la broche d'entrée pin PD2
if(mode_JN==0) // si la valeur de mode_JN est à 0
{
Mode_Nuit(); // alors Mode_Nuit
}
else
{
Mode_Jour(); // sinon Mode_Jour
}
}
|